When you enroll a person in a biometric authentication system, facial and fingerprint data are stored in a database. When you try to log into the system, this information is checked and compared with the previously collected data. If there is a match, access is allowed.
Despite the convenience of using biometrics, it is possible to fraud or manipulate the biometric sensors deliberately or inadvertently. Therefore, in addition to the comparison, it is extremely important to pay attention to the level of similarity between the matched biometrics, which will further ensure the security of authentication.
Below I will show you step-by-step how to use Postman and make the comparison between biometrics, using the BioPass ID feature set to make requests to the API.
1. Get the biometric API key via Postman
To perform operations on the biometrics API, you will need an access key that identifies you and provides access to the various functionalities of the system. To obtain one, see the previous article on enrolling an individual's facial biometrics via postman.
2. Extract the image templates in Postman
Since the biometrics platform uses only the "templates" taken from the images for the different biometric identification features, you need to perform, before the " face match" request, the template extraction operation from the face images you want to compare.
2.1 Configure the template extraction request in Postman
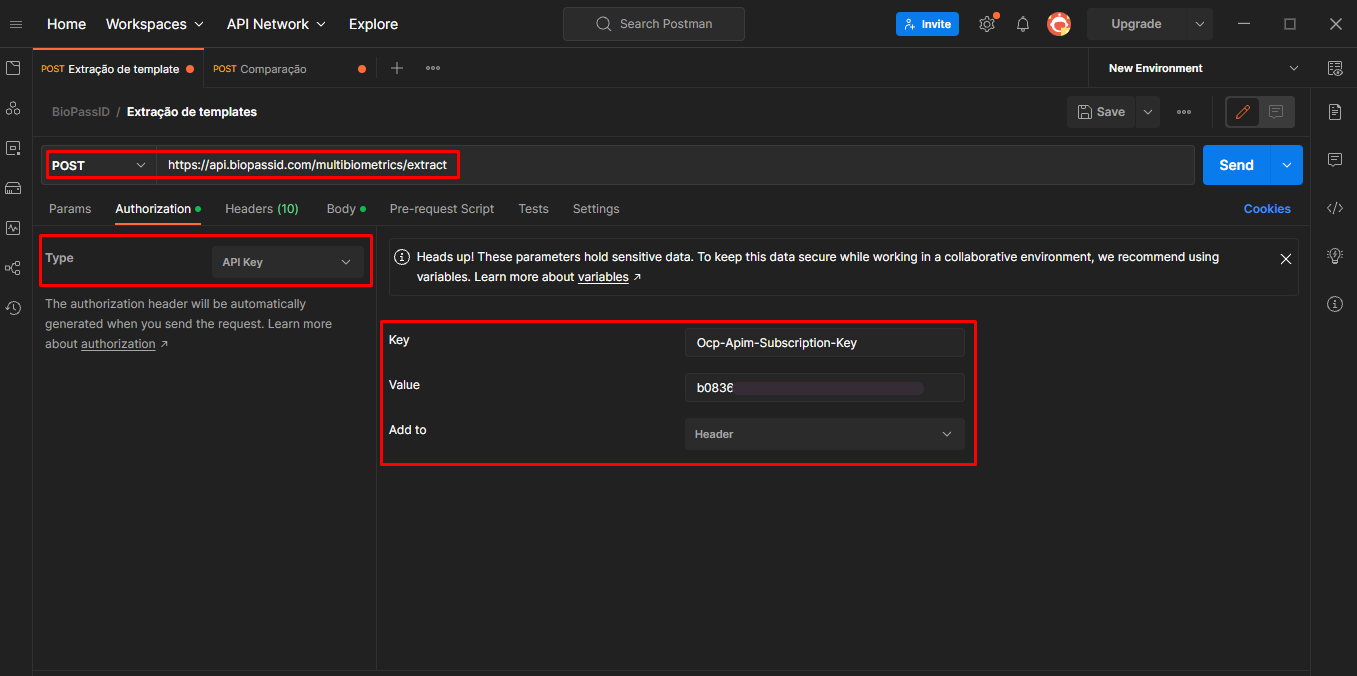
In the authorization header, select the type for "API Key". Then fill in the "Key" and "Value" fields respectively with Ocp-Apim-Subscription-Key and the value of the "API key", which is the access key mentioned above. You also need to select the "Header" option in the "Add to" field.
As the biometric API documentation shows, the url used for this call is https://api.biopassid.com/multibiometrics/extract and the method is "POST". All the fields mentioned are marked in red as shown in the image below:
Then fill in the parameters for the body of the request. Then select the "Body" section, mark the "raw" point and choose the JSON format from the drop-down list. JSON is a data formatting standard used to exchange information between systems because it is lightweight and easy for humans and computers to understand.

The body structure has the object "Extract", which represents the model extracted from the image, inside it the fields: "Type", which refers to the type of biometrics of the image provided, and can assume the values "FINGER" and "FACE", "Format", which determines the format of the model to be returned. The supported formats are: BIOPASS, ISO_IEC_2005_19794_2, ISO_IEC_2011_19794_2 and ANSI_INCITS_378. And the "Artifact" field, which receives the biometric image encoded in base64 string.
Here is how the structure looks like in Postman:
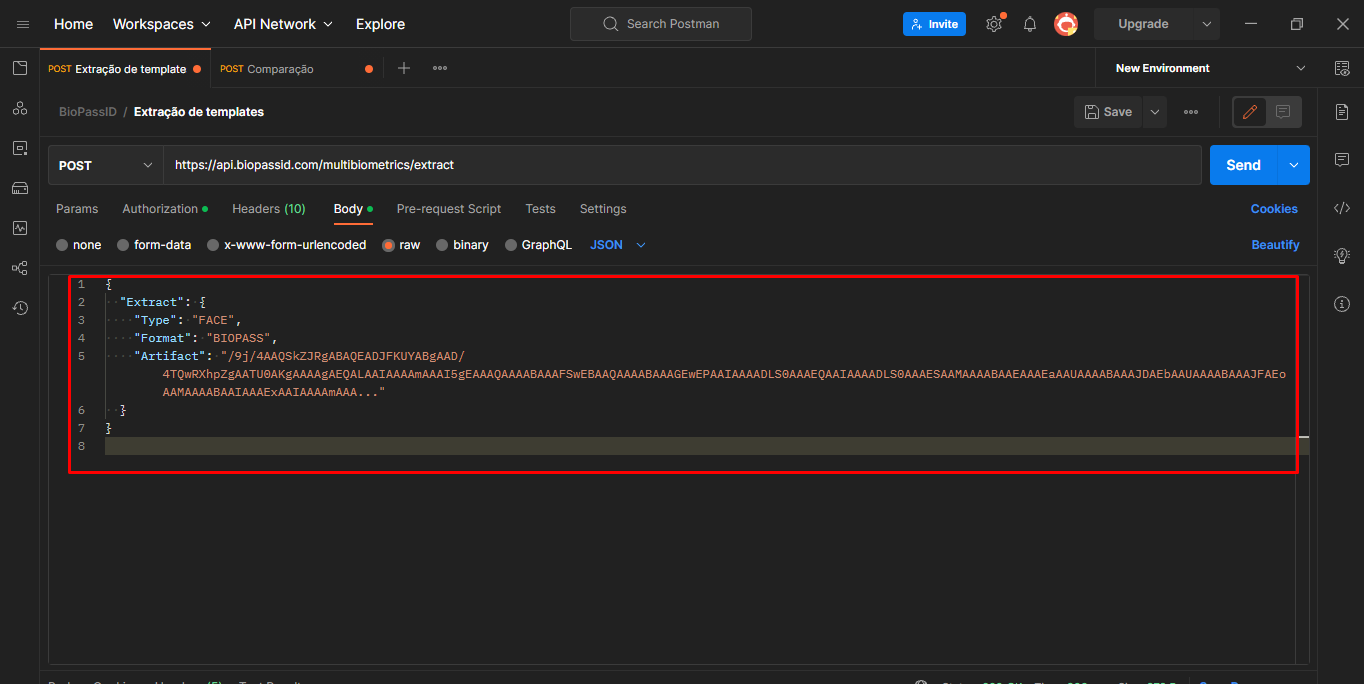
Note that the "Type" parameter is getting the biometrics type "FACE", since we will be comparing facial images and for Format choose "BIOPASS". Regarding the "Artifact", where it is necessary to convert the image into base64, read step 5 of the tutorial Enrolling the facial biometrics of an individual via Postman. There you will learn what base64 is, why it is used, and how to convert the file.
To assist you in the operation, below is the partially filled in code. You just need to replace the contents of the "Artifact":
2. 2 Check the status of the operation
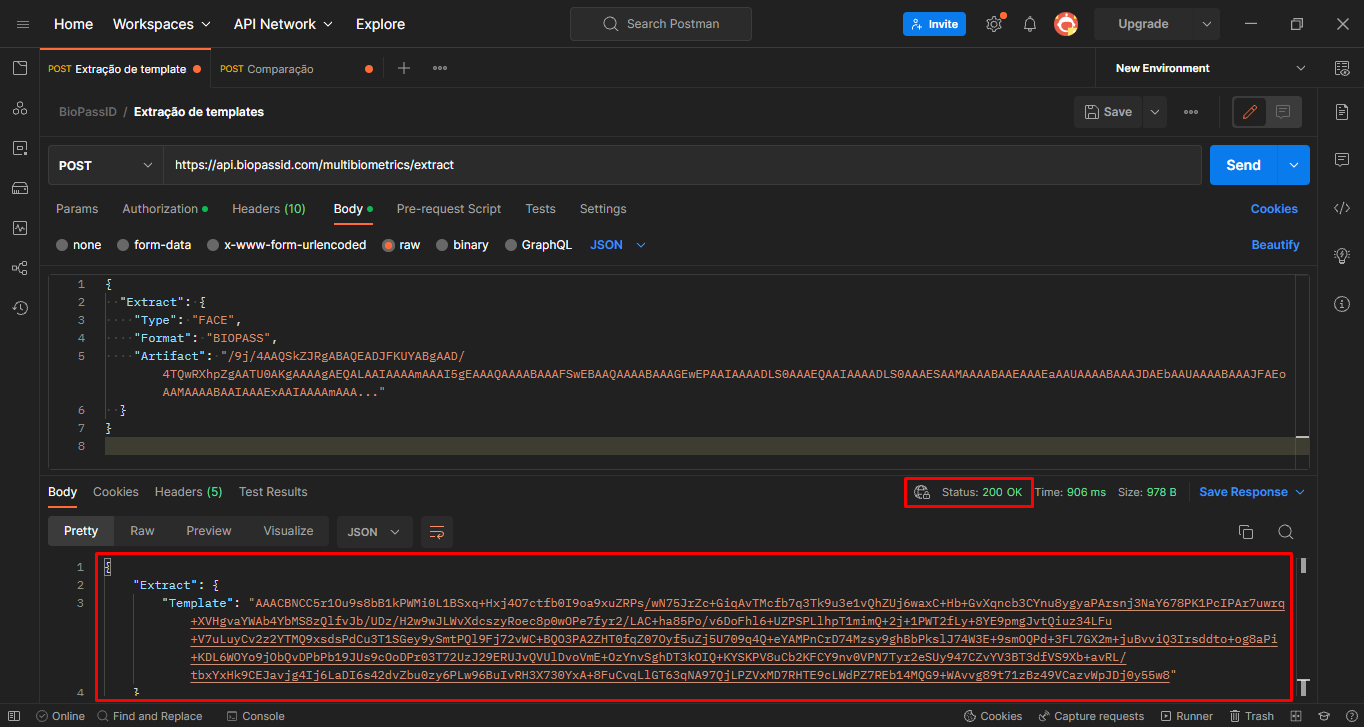
After sending the request, you immediately receive a response of success or failure of the operation. In case of success, you can see the status "200 OK" and the body of the response with the object "Extract" and the field "Template", containing the template extracted from the image to be compared. Save the Template content in the notepad.
Now look at the example of a successful transaction:
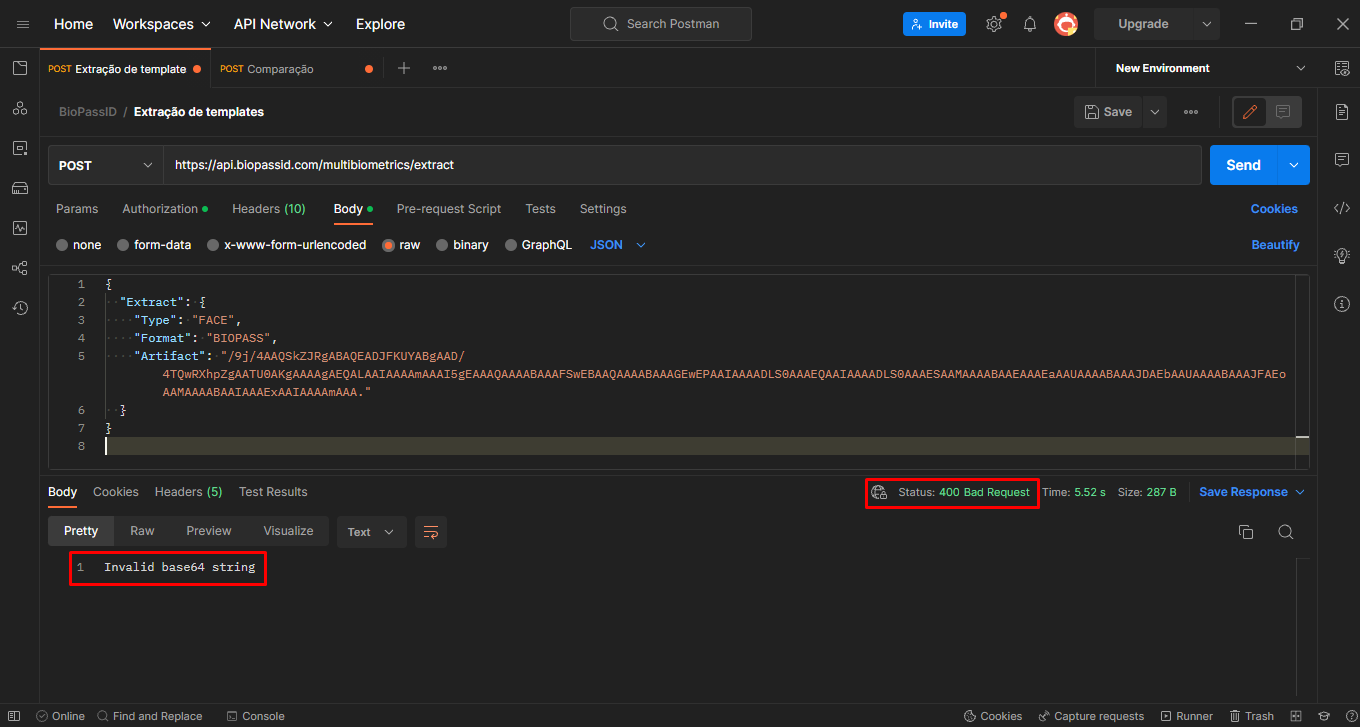
If the operation is unsuccessful, we get as response status a numeric code starting with the numbers 4 or 5, along with the reason for the error. Here is an example:
To see all the descriptions and reasons for failures, please take a look at the biometric API documentation.
2.3 Extract the second image for comparison
Before you declare the extraction finished, it is important to remember that you need two images for comparison. Therefore, you need to perform two template extractions. Since the content of the first request is saved, repeat the same steps to extract the second image and also save the content in a notebook. Once this has been done, we can proceed to the comparison phase.
3. Compare images
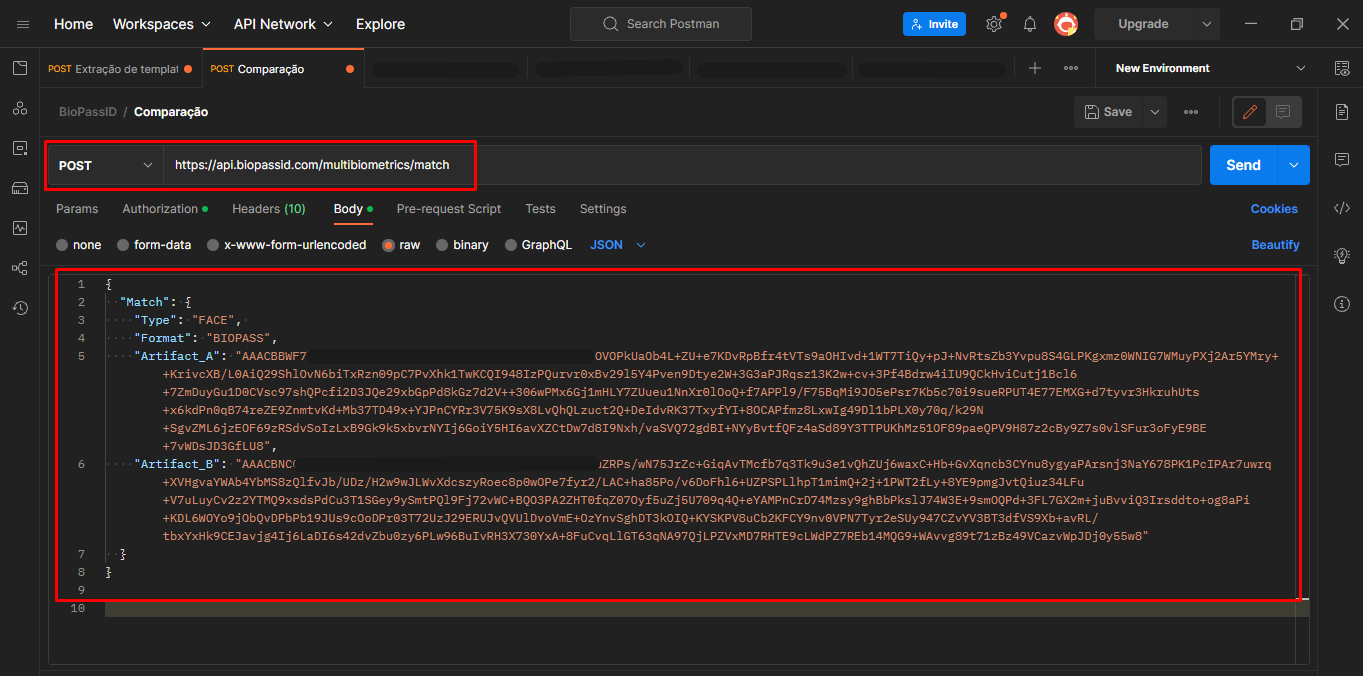
To execute the operation that compares a person's facial biometrics, we keep the same configuration in the authorization header as in the previous request. We only change the url of the call to: https://api.biopassid.com/multibiometrics/match and the body of the request, where we add the templates extracted in the previous operations.
The request structure is composed of a "Match" object, which represents the correspondence between the compared images, and inside it the fields: "Type", "Format" (both explained in the template extraction transaction), "Artifact_A" and "Artifact_B", which receive the previously extracted contents, those saved in the notepad.
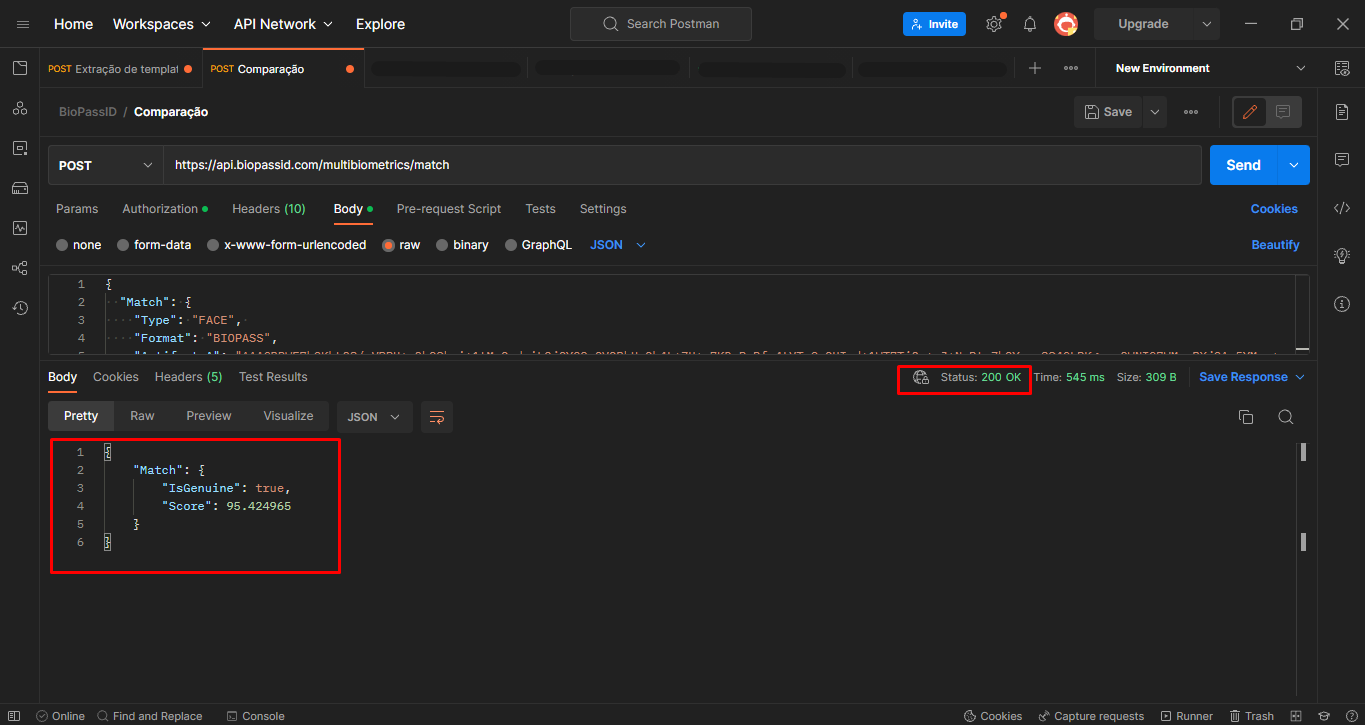
The response will be a JSON message with a Match object that has two fields: "ISGenuine", a boolean field that indicates through true or false responses whether the two biometrics are matching. And the "Score", a numeric field that indicates the similarity level of the two biometrics. Its value can range from 0 to 100.
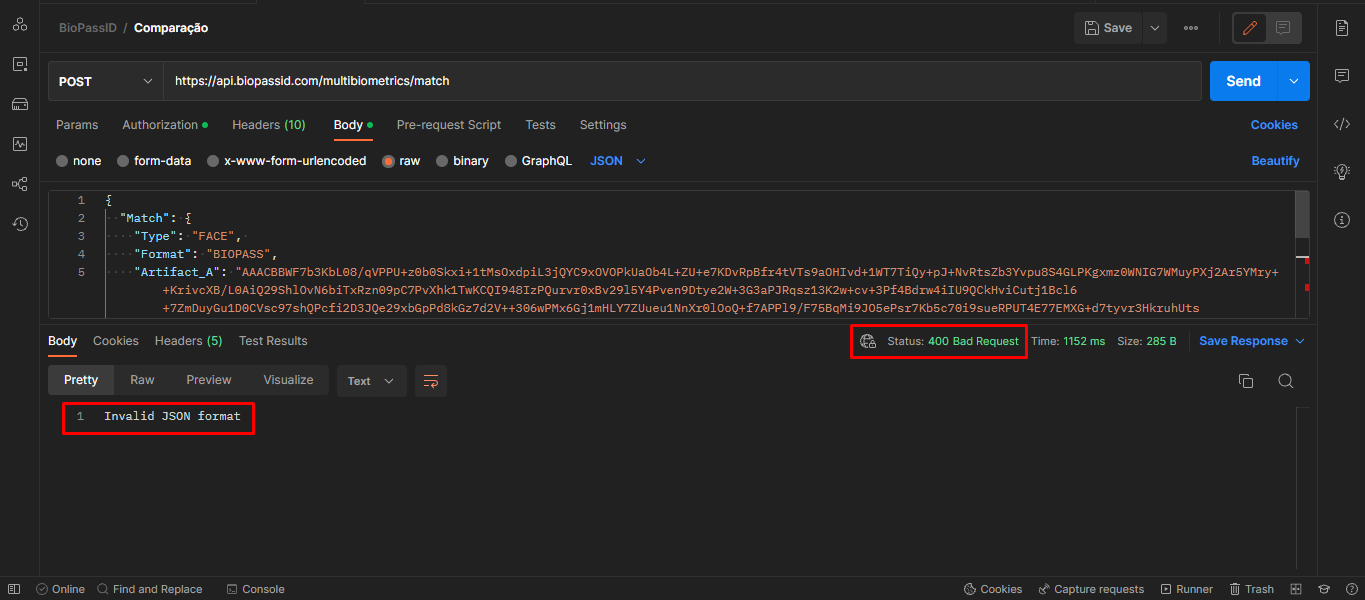
The failure cases follow a similar pattern as the extraction request: a status code starting with the numbers 4 or 5, followed by the reason. The image below exemplifies an unsuccessful operation, where the reason is invalid JSON format.
4. Ready to use Postman?
In this article, I have shown how biometric matching works with the BioPass ID feature set through the Postman platform to make the requests to the API.
An important process to avoid possible biometric fraud that ensures authentication security.
That's it for now and see you in the next article!


